
 Excerpt from The Complete Idiot’s Guide to Computer Basics, 5th Edition
.
I get calls all the time from friends, relatives, and colleagues who claim that a file they were working on mysteriously vanished. In about 1 percent of those cases, they’re right – whatever file they were working on did vanish. Perhaps they didn’t save it when the program asked them to or a power outage simply wiped the file off the map. In 99 percent of these cases, however, the person simply misplaced the file.
Tracking down misplaced files requires a certain amount of patience and the confidence that the file still exists. It also helps to know some file-hunting tricks:
- Click the Start button and point to Recent Items or My Recent Documents to view a list of the last 15 documents or so you opened. Click the name of the desired document.
- Run the program you used to create or edit the document and open the File menu. Most programs list the last four or five documents you opened at the bottom of the File menu.
- Run the program you used to create or edit the document and then click File, Open. This usually displays the contents of the folder in which the program normally saves documents.
If you share your computer and are afraid that someone will use the recent items list to find out what you were looking at, you can clear the list. In Windows XP, click Start, My Recent Documents, Clear List. In Vista, click Start, right-click Recent Items, and click Clear Recent Items List.
Inside Tip
If Recent Items or My Recent Documents is not on the Start menu, the feature may be turned off. To turn it back on, right-click the Start button, click Properties, and click the Start Menu tab. In Windows Vista, click Store and Display a List of Recently Opened Files to place a check in its box and click OK. In Windows XP, click Customize, click the Advanced tab, and click List My Most Recently Opened Documents to check the box. Click OK and then click OK again to save your changes.
If none of those quick search tricks turns up the document, you can use the Windows Search utility to hunt for the file by name or by a specific phrase or string of characters included in the document.
Take the following steps to search for a file in Windows Vista:
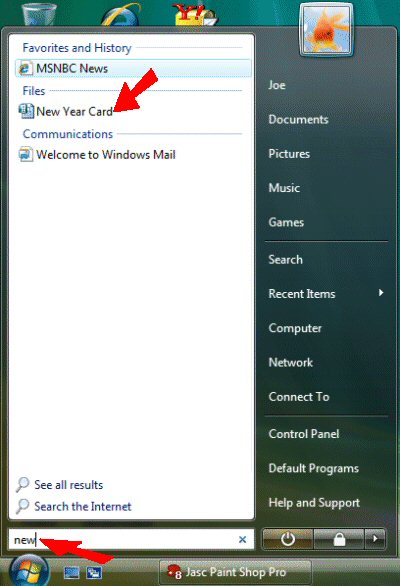
- Click the Start button.
- Start typing the name of the file or folder you’re looking for. As you type, Windows searches your computer and displays a list of items that match what you typed. The more you type, the narrower the search.
In Windows XP and Vista, you can perform a more advanced search using the item’s name, file name extension (which denotes the file’s format), the date on which the file was last modified, the contents of the file, and so on.
- To begin, click Start, Search.
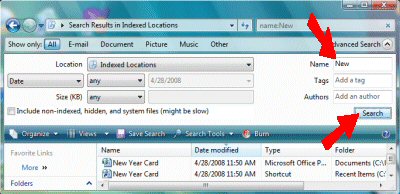
- In Windows Vista: this opens a Search window. Click Advanced Search to display additional search criteria. Enter any criteria you want Vista to use to search for items, and click the Search button.In Windows XP: the Search Results dialog box appears. Click All Files and Folders or Documents (to limit the search to only the document files on your computer), enter your search criteria, and click the Search button.
Computer Cheat
Most documents you create in a word processor, such as Microsoft Word, have names that end with the .DOC file name extension. You can type *.doc in the Name or All or Part of the Filename boxes to find all documents that have the .DOC file name extension. The asterisk is a wildcard character that stands in for any and all characters that come before the .DOC file name extension. If the program uses a different file name extension, replace the .doc with the extension the program uses.