
My wife was having trouble logging into her Novell Groupwise account at her school from home. When she tried to login, she kept getting this error message: Your login is not current. Please login again.
I tried clearing the browser cache as some have recommended elsewhere, but that didn’t help. The solution for us was to use a different DNS (domain name server). Instead of using the Wildblue satellite Internet DNS, we adjusted the network’s TCP/IP settings to use the DNS offered by OpenDNS, an alternate DNS (it’s free).
Change DNS in Windows 7
Here’s what you do in Windows 7 (and probably Windows Vista, too):
- Click Start, Control Panel, View network status and tasks (below Network and Internet).
- Click Change adapter settings (on the left).
- Right-click the network connection through which you connect to the Internet and click Properties.
- Click the TCP/IP entry (below This connection uses the following items) and then click the Properties button (below the list). You may have more than one entry, such as Internet Protocol Version 6 (TCP/IPv6) and Internet Protocol Version 4 (TCP/IPv4). On my system, the one that has the DNS settings is the IPv4 one, but you may need to check both to find the right one.
- Click Use the following DNS server addresses if this option is not already checked. If the option is checked, jot down the numbers in the Preferred and Alternate DNS server boxes, so you can change back to the original settings if this doesn’t work.
- Enter the following DNS server addresses:
Preferred DNS server: 208.67.222.222
Alternate DNS server: 208.67.220.220 - Click OK and then click OK again to save your settings.
- Try logging into your Novell Groupwise account. If it works, please come back and let me know.


Change DNS in Windows XP
Here’s how you change your DNS addresses in Windows XP:
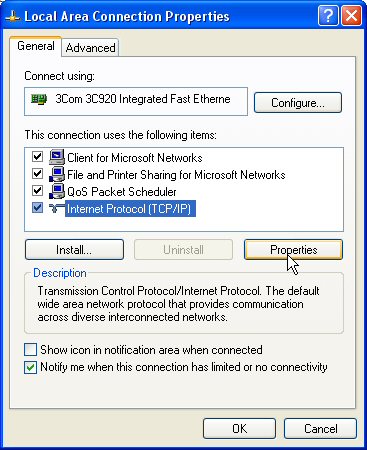
- Click Start, click Control Panel, click Network and Internet Connections, and then click Network Connections.
- Right-click the network connection that you want to configure, and then click Properties.
- On the General tab (for a local area connection), or the Networking tab (for all other connections), click Internet Protocol (TCP/IP), and then click Properties.
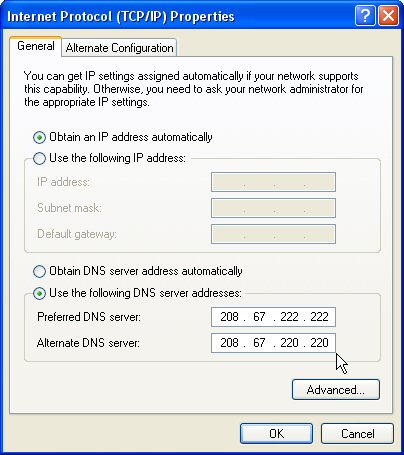
- Jot down the existing DNS settings, whatever they happen to be.
- Remove the checkmark next to Obtain DNS server address automatically.
- Click Use the following DNS server addresses, and then type the preferred DNS server and alternate DNS server IP addresses in the Preferred DNS server and Alternate DNS server boxes, as shown below.
- Click OK to save your changes.
Now try it! And don’t forget to come back here and let me know whether this helped.
Joe,
Thank you! My boss had this exact problem and the DNS change worked perfectly. He had to restart after the change and all is well now.
Thank you for posting your resolution!
-David
checking information
Could you please help me? I have the same problem but it’s on my blackberry. I have been able to get on by using the blackberry before, but it rarely works, like maybe 1/30 times. Annoying. I read somewhere that I’m completely SOL (Sh*t out of luck) bc it has to do with groupwise blocking connection bc phones use sharred ip addresses? I hope this isnt the case.
Heey.:)X
DO I HAVE TO DOWNLOAD NOVEL GROUP WISE.?????
PLEASE ANSWER
FROM
LIZZIE
Lizzie–Nope, you’re just logging into the network remotely, just as if you logged onto any web-based account.
unable to connect to e-mail
it doesn’t work
Worked great! Thank you.
DIDN’T WORK
It didn’t work
now i can login thanks 55 star wibsite