
In my previous post, “Make a Website, Starting with Bluehost,” I showed you how to sign up with Bluehost, register your own unique domain name, set up an email account on that domain, and install the WordPress blogging platform. With WordPress, you can instantly begin posting content on the Web and establishing your own Internet presence. You can also create a combination website/blog, which is the ultimate goal of this series.
In this post, I show you how to completely change the layout and appearance of your WordPress blog by changing its theme. A theme is a collection of computer code that functions behind the scenes to control the function and formatting of your blog.
Finding and Choosing a WordPress Theme
Numerous talented people, and some untalented ones, have designed themes for WordPress, most of which are free for the taking. As I’m writing this, WordPress boasts a collection of nearly 800 themes. To check them out, head to the Free Themes Directory at WordPress.org.
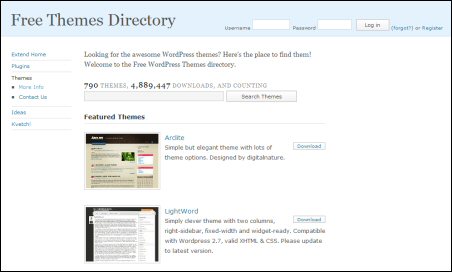
Upon arrival, choose one of the following options to track down a theme (scroll down the page to access the different options):
- Search: Click in the search box, type one or more tags to describe what you’re looking for, and click Search Themes. By “tags,” I mean things like “blue 2-column” or “silver 3-column custom header.” (For a complete list of tags, click More Info in the navigation bar on the left and then scroll down the page.)
- Featured Themes: The directory always lists a collection of about fifteen featured themes.
- Most Popular: Choosing a popular theme is usually a safe bet. Themes are usually popular for a reason, actually two reasons – it looks good and has fewer problems than less popular themes.
- Newest Themes: If you’re looking for something fresh, check out the newest themes on the block.
- Most Recently Updated: The most recently updated themes are probably in the process of working out some bugs, which may prove that they’re buggy or just show you that the designer cares enough to keep the theme updated.
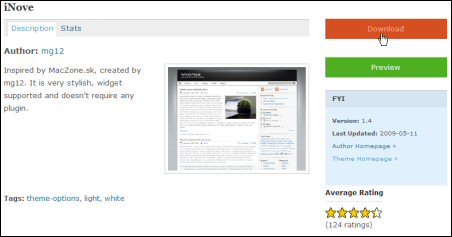
Looks aren’t everything. A theme can have the right look but be coded inefficiently making it buggy or difficult to customize. Unfortunately, you can’t tell just by looking at the theme or its description. When previewing a theme, be sure to check out what others have said about it. You’ll may have to try a few themes before you hit on one that has the right combination of good looks and performance.
Downloading a WordPress Theme
After you find a theme you like, the next step is to download it. This is pretty easy. You just click the Download button and follow instructions to copy the theme to your computer.
Tip: Consider creating a separate WordPressThemes folder on your hard drive and storing all of your downloaded themes in this folder.
Uploading Your Theme
Themes are stored as compressed (zipped) files, so you want to decompress the file before uploading it. To unzip the file, take the following steps:
- Open the folder in which you saved the theme file you just downloaded.
- Right-click the zipped theme folder and click Extract All.
- Follow the onscreen instructions to complete the operation.
Assuming everything has gone according to plan, you should now have two folders of the same name – one zipped and one not – on your computer. You can delete the zipped version, if desired.
Now, upload the unzipped folder to the WordPress “themes” directory on your hosting service. Here’s how you install a theme using Bluehost:
- Go to Bluehost and login to your account. The Control Panel appears.
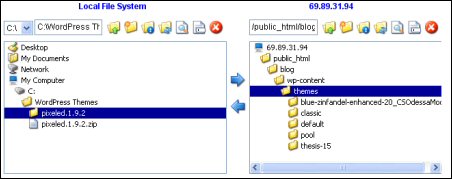
- Click Unlimited FTP and wait for the FTP window to appear, as shown below.
- In the Local File System list, change to the drive and folder on your computer where your theme folder is stored.
- In the file list for your hosting service, double-click on the public_html folder and then change to the folder that contains your WordPress themes. If you installed WordPress in the root directory, your themes should be in /public_html/wp-content/themes. You should already have a few theme folders inside the themes folder.
- Go back to the Local File System list and click the theme folder you want to upload to your hosting service, and then click the right arrow that appears between the two lists, as shown below.
- Wait until the upload is complete. The theme folder you uploaded should now be displayed in the themes folder on your hosting service.

Now that the theme is in place, you’re ready to activate it in WordPress.
Activating Your Theme
From the WordPress Dashboard, you can activate your theme. Here’s how:
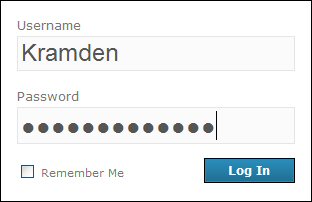
- In your Web browser, type the address of your blog followed by /wp-admin and press Enter. For example, you might type something like www.yourname.com/wp-admin and press Enter. The WordPress login screen should appear, as shown below.
- Type your username and password in the appropriate boxes and click Log In. The WordPress Dashboard appears.
- Click Appearance and then Themes.
- Click the theme you just uploaded. WordPress displays a preview window showing how your blog might look with the new theme. Previews can be deceiving, but they give you a general idea.
- Click the Activate link in the upper right corner of the preview window. This applies the theme to your blog, which should now have an entirely new look.

The cool thing about themes is that you can always switch back to what you had if you don’t like what you see.
Installing the Thesis Theme
If you’ve been following this series, you know that I’m a big fan of the Thesis theme for WordPress. It costs $87 but it looks great, and it has saved me much more than $87 in time and aggravation. The choice is yours, but if I were you, I’d go with Thesis.
The steps for installing Thesis are almost the same as those for installing any other theme. You download the theme to your computer and then upload it to the /wpcontent/themes folder on your hosting service. Then, you need to take a few additional steps. Here’s what you do if you’re using Bluehost:
- After uploading the Thesis theme, login to Bluehost and go to the Control Panel.
- Click the File Manager icon, click Go, and wait for the File Manager to appear.
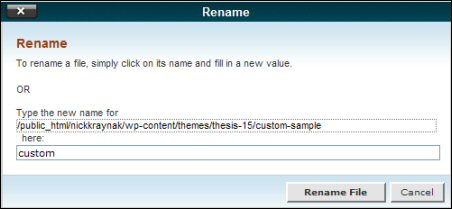
- Wind your way to the /wp-content/themes/thesis-15/custom-sample folder, click Rename, and change the folder name custom-sample to just custom as shown below.
- Change back to the /wp-content/themes/thesis-15/ folder.
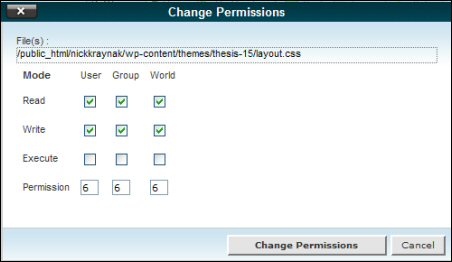
- Select the layout.css file, click Permissions, and change the file’s permissions to 666, as shown below.
- [optional] If you’d like to give Thesis the ability to auto-crop thumbnail images for you, then go to /wp-content/themes/thesis-15/ click the cache folder, click Permissions, and change the folder’s permissions to 775 as shown below.
- Inside your WordPress dashboard, go to Appearance, Themes, and then activate Thesis 1.5.

Tweaking a Standard WordPress Theme
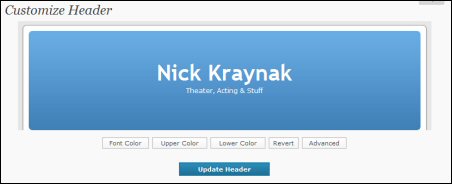
Some themes offer a few ways you can tweak the design without having to edit the files that comprise the theme. For example, in the WordPress Default theme, you can click Appearance and then Header Image and Color to give your blog’s header a unique look.
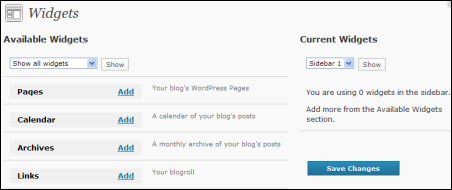
Some themes support widgets that allow you to add stuff to the sidebars. For example, I use widgets on both JoeKraynak.com/blog and ComputerChimp.com to display cover images for the books I’ve written along with links to recent posts, small advertisements, and a list of categories.
To add or remove widgets, click Appearance and then Widgets, and use the available options. (The figure below shows a few types of available widgets.) I’ll talk more about creating widgets in a future post.
To really take control of your theme, however, you have to edit the various files that comprise the theme. To do this, click Appearance, Editor. The WordPress Editor appears, as shown below, displaying the content of one of the theme’s editable files. On the right is a list of files you can edit.
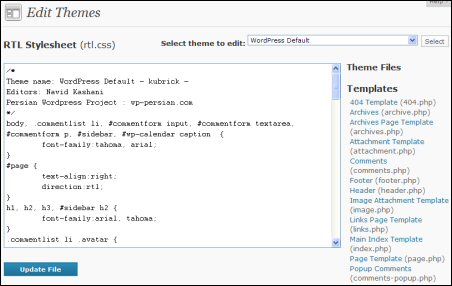
Most of the changes you’re going to make are to CSS (Cascading Style Sheet) settings that control things like the size, position, and color of text and how images are positioned in relation to text. CSS can be very complicated. I’ll be blogging about that in the future, too.
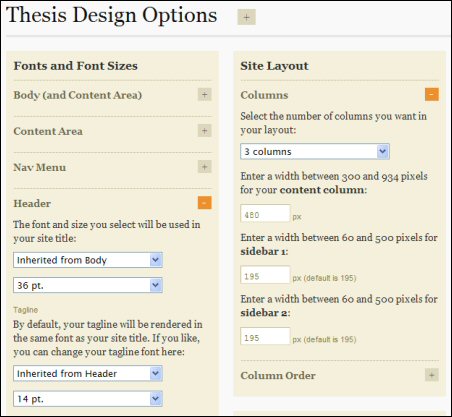
Tweaking Your Blog Design with Thesis
With the Thesis theme, you can tweak your blog’s design without having to deal with CSS. Instead, Thesis provides its own control panels – Thesis Options and Design Options that allow you to control much of the formatting and layout by selecting your preferences via the control panels.
To access the Thesis control panels, click Appearance and then Thesis Options or Design Options.
Although Thesis lets you tweak the design and layout with its control panels, these control panels do not give you full command over your blog. For more advanced customizations, you’ll need to know how to edit two Thesis files in its “custom” folder – custom.css and custom_functions.php. I’ll show you some examples in a future post.
That’s it for now. In my next post, I’ll introduce you to my favorite WordPress plugins – add-on features that can really make your WordPress blogging easier and more enjoyable. I’ll show you how to install the plugins, activate them, and configure them for your use. See “Make a Website: Essential WordPress Plugins.”
That’s great info, but how the heck do you change permissions of a file? This is most likely very basic, but I need step-by-step instructions. Please help!
Under the heading “Installing the Thesis Theme,” step 5, I show how to change file permissions in Bluehost. Using the File Manager, you click the file, click the Permissions button, and then select the checkbox options until the desired number is displayed.
The process for changing permissions using a different hosting service may be different. For example, GoDaddy doesn’t display the numbers, so it’s a little more tricky trying to figure out which permissions to enable and disable. You can use the figure I provided as a guide to setting permissions using hosting services that do not display the number.
I called Bluehost for help. Bluehost is telling me not to change the permission of the layout.css because then anyone in the world can have access to change it. What do I do? I\’m confused.
From Girlie (one of the Administrators on the DIY Forums):
In order for “anyone” to write to that file, they’d have to have already gained access to the files on your server through some other security loophole – which would be the more important concern if it ever happened to me.
In other words, I’m “anyone”, but I still can’t do anything with that file unless I’ve managed to hack into your server in some way which gives me the ability to write to it. Permissions alone grant me no extra power without some form of access to the file itself.
(And FWIW, I don’t have to set permissions on my layout.css to 666; they work just fine at 644, presumably due to extra security features such as suExec or suPHP my host has in place, which allows scripts to work with stricter permissions and less risk.)
Thanks for the reply. And are you saying that with Bluehost I don’t have to switch the layout.css to 666, that I can keep it 644?
Hi, Smiles–
No, that’s Girlie’s hosting service.
LATER: On Bluehost, setting file permissions for layout.css to 644 seems to work fine.
very detailed step-by-step instruction to install the theme … how useful this post is to me 🙂
Great info presented in a clear and concise way. Best tutorial I’ve read yet. Thanks.
hi.
THE THESIS PEOPLE SAY TO SET YOUR CACHE AT 775 NOT 777…
Hi, Amy–
You are correct. Thanks. For some reason I can’t recall right now, I had to set the permissions to 777.
Joe
This was awesome. Thank you for the great instructions!
I was overwhelmed by my novice understanding until I saw this post. Thanks so much!
Excellent tutorial on installing WordPress themes and Thesis